Here is a frustrating scenario: You just bought a PC with 32GB of RAM. You install “Better Minecraft” or “All The Mods.” You launch the game, and 5 minutes later—it crashes. Or you get massive lag spikes every few seconds.
Your PC isn’t broken. The problem is that by default, Minecraft is configured to use only 2GB of RAM.
It doesn’t matter if you have a NASA supercomputer; if Java is locked to 2GB, modpacks will run out of memory and crash (Exit Code 1). You have to manually tell the launcher, “Hey, you can use more power.”
Before I show you the buttons to click, I need to stop you from making the #1 rookie mistake.
Do NOT allocate all your RAM to Minecraft.
If you have 32GB, do not give Minecraft 20GB. Why? Because of Java Garbage Collection. Think of RAM like a trash can. Java fills it up with temporary files. When it gets full, the “Garbage Collector” empties it.
Small Trash Can (4GB): Java empties it quickly. Small micro-stutter, barely noticeable.
Massive Trash Can (20GB): Java waits until it’s full. Then, it pauses the ENTIRE GAME for 2–3 seconds to empty that massive pile of trash.
The Cheat Sheet (Use This):
Vanilla / Light Shaders: 2GB – 4GB. (Anything more is a waste).
Light Modpacks (50-100 Mods): 4GB.
Heavy Modpacks (Better MC, RLCraft): 6GB – 8GB.
Extreme (All The Mods 9, GregTech): 8GB – 10GB.
The Rule: Never go above 10-12GB unless you are running a server or know exactly what you are doing.
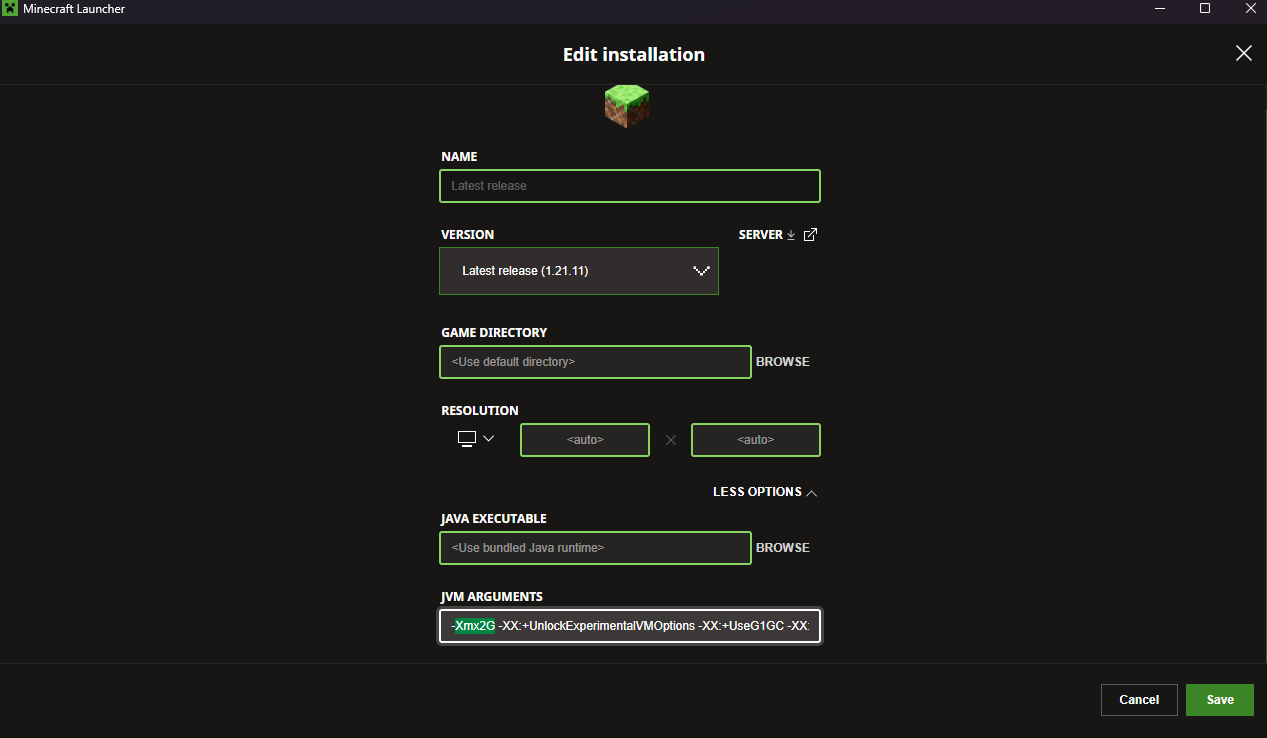
If you are playing vanilla or using the standard launcher, the setting is hidden deep in the menu.
Open the Minecraft Launcher.
Go to the Installations tab (at the top).
Hover over the version you play (e.g., “Latest Release” or “Forge 1.21”) and click the Three Dots (…) > Edit.
Click More Options (it’s a small text link at the bottom).
Look for the line that says JVM ARGUMENTS.
Find the text that says -Xmx2G.
Change the 2G to 4G (or 6G, 8G). Do not touch anything else.
Click Save.
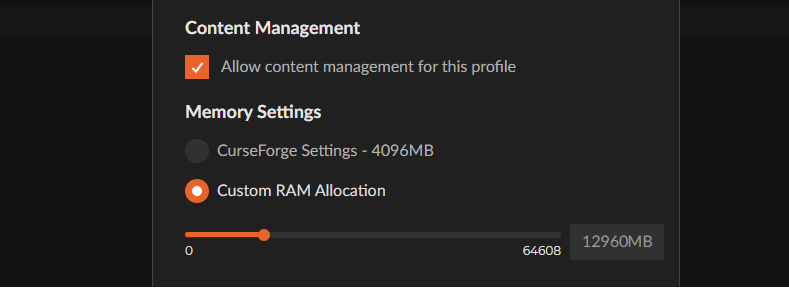
If you are playing modpacks, you are likely using CurseForge, Prism, or Modrinth. Good news: it’s way easier here.
Open CurseForge.
Click the Settings Gear (bottom left).
Click the Minecraft tab.
Scroll down to “Java Settings”.
There is a visual slider. Drag it to 6144MB (6GB) or 8192MB (8GB). Done.
Right-click your instance (the modpack icon).
Click Edit.
Go to Settings > Memory.
Check the box to override global settings and type in your max memory (e.g., 8192 MiB).
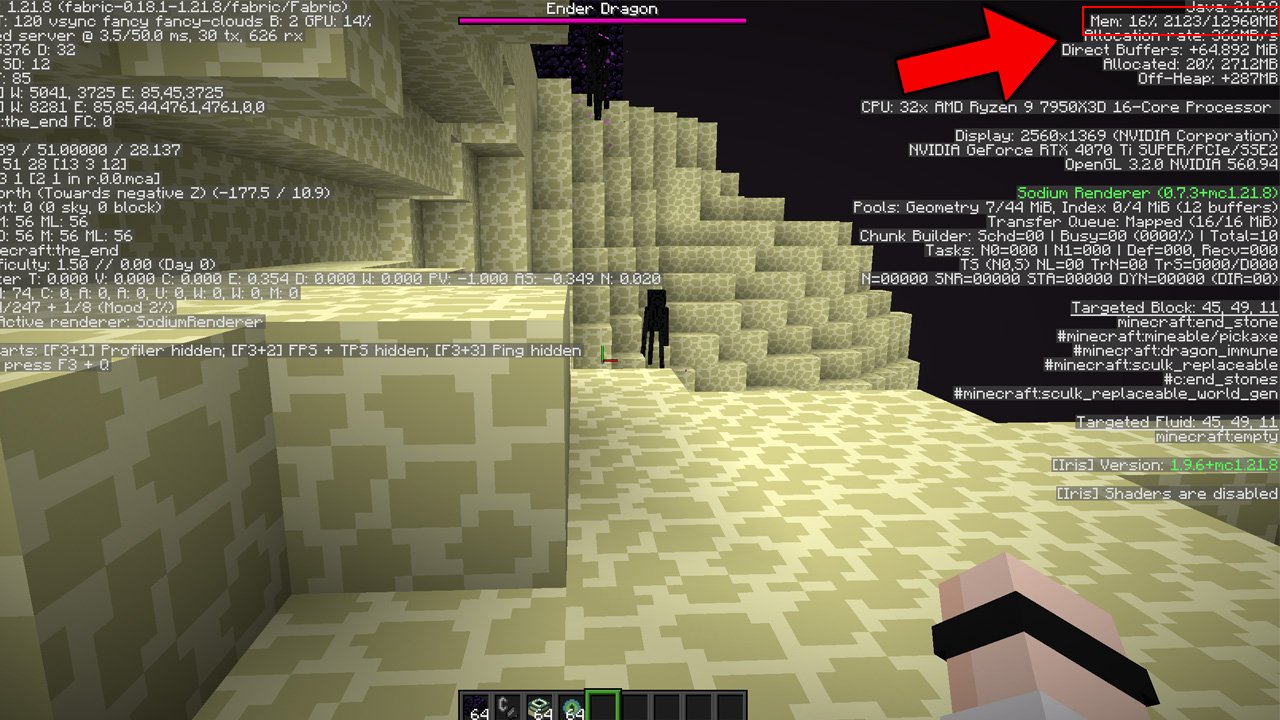
Launch the game and load into a world.
Press F3 to open the debug screen.
Look at the top right corner for the line that says Mem:.
It should say something like Mem: 45% of 8192MB.
If it says of 2048MB, you did it wrong. Go back and check if you saved the profile.
If you allocated 8GB of RAM and you still have lag, RAM is not your problem.
CPU Bottleneck: Minecraft cares more about single-core CPU speed than RAM.
Optimization Mods: You likely need Sodium. RAM stops crashes; Sodium fixes lag.
Total System Memory: If your laptop only has 8GB of TOTAL RAM, you cannot give Minecraft 8GB. Windows needs memory too. If you starve Windows, your whole PC will freeze. Leave at least 2GB-3GB for the system.
Stop overthinking it.
Set it to 4GB for Vanilla.
Set it to 8GB for big Modpacks.
Forget about it.
Allocating 32GB won’t make your FPS higher; it will just make your lag spikes longer. Find the sweet spot and get back to playing.
AnvilPacks.com is an independent resource and is not affiliated with Mojang Studios.
XRay Texture Pack
Fresh Animations Texture Pack
Bare Bones Texture Pack
Visible Ores Texture Pack
1.21.X Texture Packs
1.20.X Texture Packs
1.19.X Texture Packs
1.18.X Texture Packs
8x Texture Packs
16x Texture Packs
32x Texture Packs
64x Texture Packs
128x Texture Packs
256x Texture Packs
512x Texture Packs